Introduction
If you previously exported the recovery agent EFS private key (and have the .pfx file), press the Add Certificate button, browse for the .pfx file and enter its password. AEFSDR can now use the .pfx for file recovery/decryption. In that case, you will not need to scan your disk(s) for encryption keys, as described below.
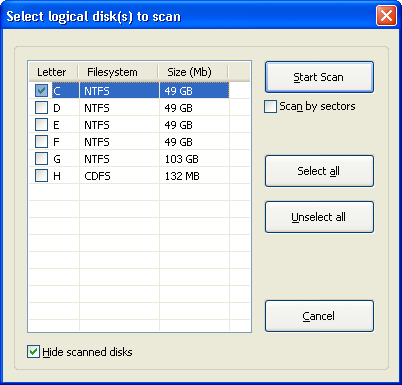
Start using the program with scanning for encryption keys. In the EFS related files tab, press Scan for keys (or select Scan | Scan for keys from the menu; or press Scan for keys button on the toolbar). The program will display the list of local logical disks, along with their sizes and file systems:

Here, you have to select the boot disk (the Windows startup disk) on which the system Registry and encryption keys are located. In some cases, however, the encryption keys are located on a different disk. If you are unsure, check multiple disks for scanning.
By selecting the Scan by sectors option, you can force the program to scan the disk(s) at the lower level, sector by sector, so it may find the keys that have been deleted, or after the disk has been formatted. Note that this type of scanning is slower than the regular one, so we recommend to perform the first scan with this option disabled, and only using the low-level option if the keys are not found.
Note the Hide scanning disks option at the bottom. If this option is enabled (default) and you already scanned some disk(s) during the current program session, these disk(s) will not be shown in that window as far as all the keys have been already found. If you want to list all the disks available in the system, uncheck this option.
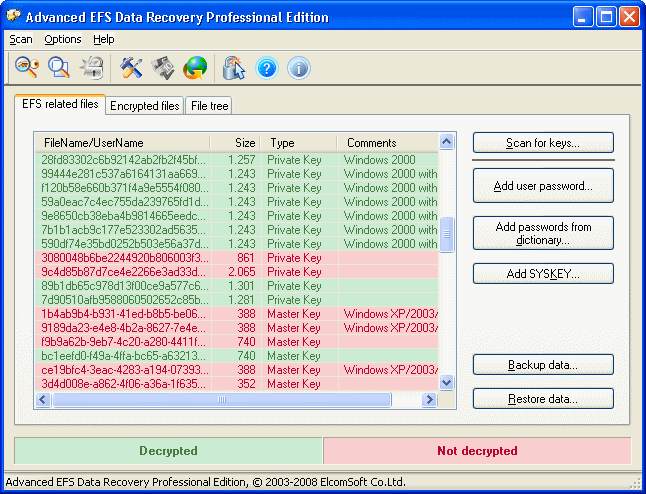
On pressing the Start Scan button, the program will scan the given disk(s) for the files required to decrypt the data:

These files are:
•Encryption keys
•SYSTEM Registry
•SAM Registry
Normally there are several encryption keys (the actual number may vary depending on the number of users in the system), and a few copies of SYSTEM and SAM Registry files (the active copy and two or more backup copies); at least one of each.
If any of those components are missing, it means that either you have selected the wrong disk (in that case, simply scan the correct one – or just all of them; the required data, if found, will be appended to the list already created), or they are not available at all (if, for example, they were deleted manually, or the disk has physical errors).
Encryption keys in that list are always in red or green color. Green one means that the key has been decrypted successfully; or if the key is in red – decryption failed.
The last column on this screen, Comments, shows additional information about encryption keys (what particular version of Windows the have been created in), and SYSKEY mode (see below).
Possible problems
If some keys were not decrypted (i.e. they're red), don't panic. Probably, these keys are not needed at all, and you can go directly to the second step – Scan for encrypted files or Browse for encrypted files. And only if AEFSDR will not be able to decrypt the files you need, return to EFS related files and try to fix the problem as described below.
Password encryption (Windows XP/2003/Vista/2008/7) or SYSKEY protection (Windows 2000)
First, if the files were encrypted on Windows XP or later version, you have to supply the (logon) password of user who encrypted the file(s), or the password of Recovery Agent. Press Add user password button, and enter the user name and password (as text or in hex/UNICODE). User name, actually, does not matter (only password does), so enter it just for the reference. There is no need to add the empty password.
Please note that you can add more than one name/password, and after adding each one, AEFSDR will try to decrypt all keys listed on that tab – on success, the color will change from red to green. Alternatively, you can use Add password from dictionary option, and load the password lists from the text file. That file should contain only the passwords, one per line, without user names (which do not actually matter). It is not recommended to use large wordlists (more than a few hundred entries), especially on Windows XP and later versions, and/or if there are a lot of encryption keys, as far as it takes a lot of time.
In Windows 2000, the password is usually not needed, until advanced SYSKEY protection is being used (for more information, see How to use the SysKey utility to secure the Windows Security Accounts Manager database). There are three possible SYSKEY options:
•Password Startup: the password is needed to unlock the startup key each time when computer is started.
•Store Startup Key On Floppy Disk: SYSKEY generates a new startup key and stores it on a floppy disk. This floppy disk is inserted each time when you start the computer.
•Store Startup Key Locally: this is the default setting. By storing the startup key on the local hard disk, Windows can access it during startup without further intervention.
AEFSDR should work just fine if last (default) option has been used in a system you're working with, i.e. the keys should be decrypted automatically. But if Startup Key is (was) stored on floppy disk, or Password Startup was selected, the program simply will not be able to decrypt some keys. In that case, you should supply the password (like in Windows XP/2003, see above). Alternatively, if you have the floppy disk with startup key, or know the startup password, you can add them to the program by pressing the Add SYSKEY button. You can add multiple passwords or keys using that feature (but one at a time). Please note, however, that after adding SYSKEY you will have to re-scan for encryption keys.
Password has been changed after encryption
After you change your domain password, you may receive an error message when you try to gain access to protected data. This problem occurs because the protected data is encrypted using a hash that is based on your password. When you change your password on the domain, the data is not re-encrypted with the new password until you first access the data. If you try to access the data for the first time while you are disconnected from the domain, the domain controller cannot be contacted. Therefore, the data cannot be accessed and re-encrypted with the new password.
By design, AEFSDR should be still able to decrypt encryption keys (and so protected data), but if not, use the same trick as for SYSKEY Protection problem, i.e. by adding user password(s). If you don't know them, try the solution described in the following Microsoft Knowledge Base article:
You Cannot Access Protected Data After You Change Your Password
Computer is a part of domain
The recovery policy provides for a person to be designated as the recovery agent. A default local recovery policy is automatically created when an administrator account logs on to the computer for the first time. When this process occurs, that administrator becomes the default recovery agent. In some situations, the first administrator to log on to Windows 2000 is not the local administrator account. An appropriate Microsoft Knowledge Base article is:
The Local Administrator Is Not Always the Default Encrypting File System Recovery Agent
If local administrator is the default recovery agent for your data, AEFSDR will work properly. If not (as described in the article mentioned above), you will have to add user passwords to decrypt the keys (see above).
Backup/restore decrypted keys
When/if encryption keys (and other EFS-related data) have been found and decrypted by the program, it is recommended to save them for the future use – to avoid scanning the disk again, or just for the case if some data will be tampered. Press Backup data button in AEFSDR, and select the file name to save what you have recovered. When you will use AEFSDR the next time, you'll be able to get all the keys by pressing Restore data button, instead of scanning the disk again, adding user passwords etc.