If you know the Apple ID and the password for entering iCloud, EPB can extract backup from the iCloud, decrypt it, and convert to the same format as used by iTunes. After converting iCloud backup to iTunes format, you can view the backup content in Elcomsoft Phone Viewer for further analysis. It is NOT recommended to restore the device from this copy.
EPB allows you to download iCloud backups created on iOS up to 14.
To download an iCloud backup, do the following:
1. In the Tools menu, select the Apple tab.
2. Select Download backup from iCloud.
3. On the Download backup from iCloud page, define the authentication type:
•Password: To use your Apple credentials (Apple ID and password)
•Token: To use the Authentication token extracted from iCloud using Elcomsoft Apple Token Extractor. For more information about extracting the token, see the Extracting Authentication token topic.
NOTE: Only backups created on iOS versions lower 11.2 can be downloaded using the tokens. In this case the Authentication token without limitations for the account with two-factor authentication or Authentication token for the account without two-factor authentication should be used.
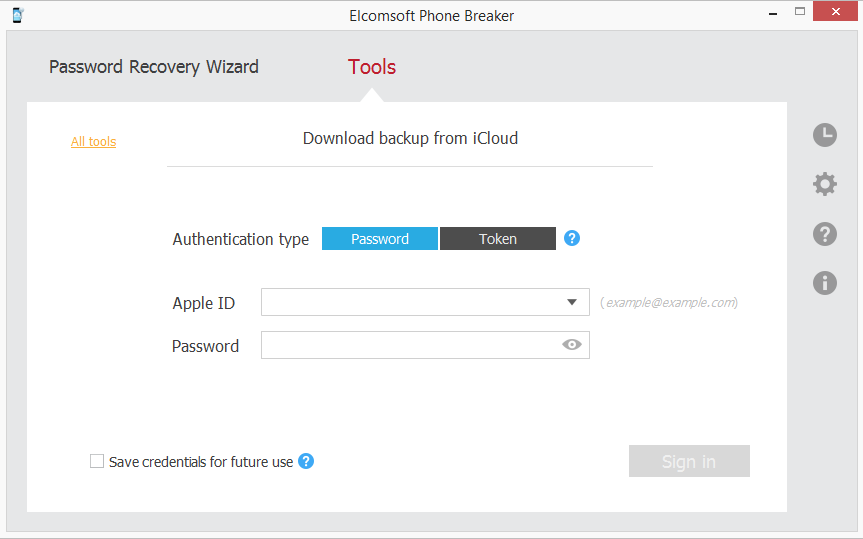
4. Click Sign in.
NOTE: If you have entered the Apple ID in a wrong format, a message about the account being locked will be displayed. Close the message and try again. Please make sure to enter your apple ID in the standard format (i.e., example@example.com).
NOTE: If the Apple ID is protected with two-factor authentication, you need to confirm sending the verification code to all of your trusted devices or to your phone.
You can select the Save credentials for future use option when logging in so that you don't need to enter them when you log in with this Apple ID again.
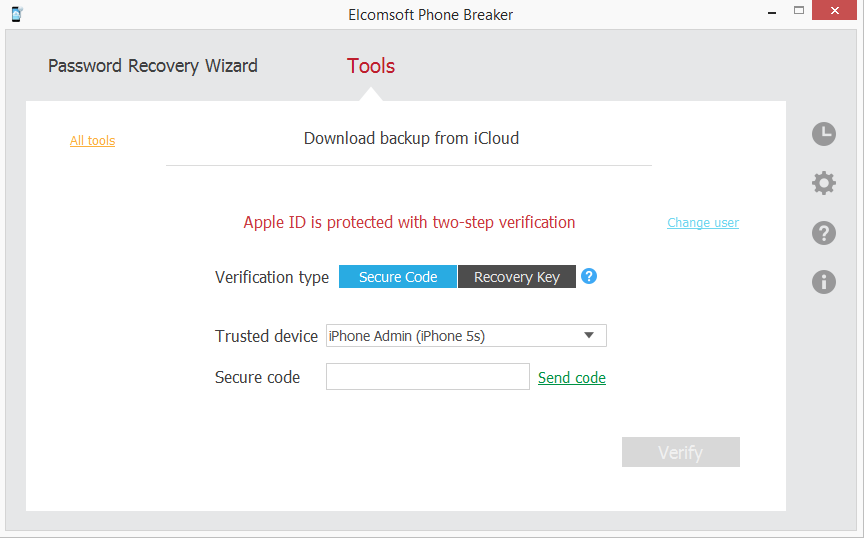
5. If the Apple ID is protected with two-step verification, verify your account by selecting one of the following authentication types:
▪Secure Code: in the Trusted device field, select a phone number or a trusted device to which the code will be sent, click Get code, and then enter the received 4-digit code in the Secure code field.
▪Recovery Key: enter a 14-character key generated defined in the Apple account settings.
6. Click Verify.
7. If the Apple ID is protected with two-factor authentication, perform authentication in one of the following ways:
▪Select Trusted Device and enter the 6-digit code in the Verification code field. Click Resend code for the verification code to be sent to all trusted devices.
▪Select Text message and enter the 6-digit code in the Verification code field. Click Send code for the verification code to be sent as a text message to the selected trusted phone number. Click Resend code for it to be sent again.
NOTE: macOS 10.12 or higher is required for sending text messages.
NOTE: Authentication via the Text message is available for the Forensic edition only.
▪Select Code generator and enter the 6-digit code in the Verification code field. The code is generated on the trusted device or via Cloud Panel.
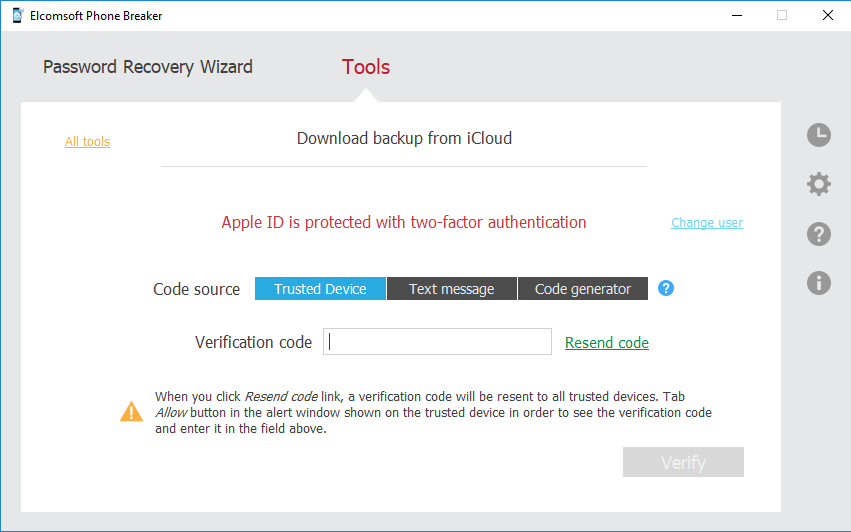
8. Click Verify.
9. The iCloud storage of backups opens.
You can view the user name, user ID, and Apple ID of the iCloud user, and the list of backups belonging to this user. By default, 3 latest backups are displayed. Hover mouse over the blue i icon to view the storage capacity and used size.
To select backups made by a different iCloud user, click Change user.
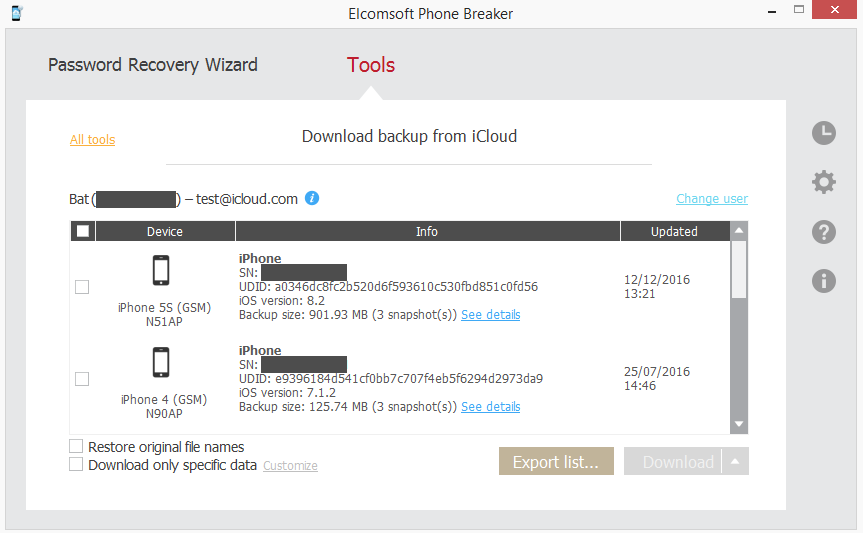
For every device, the following information is displayed:
▪Device name
▪Model
▪Serial number
▪Unique device ID
▪iOS version
▪Date when the latest backup was made
▪Size of backup
NOTE: The time is stated as it is (was) set on the device.
To view snapshot details for a device, click See details.
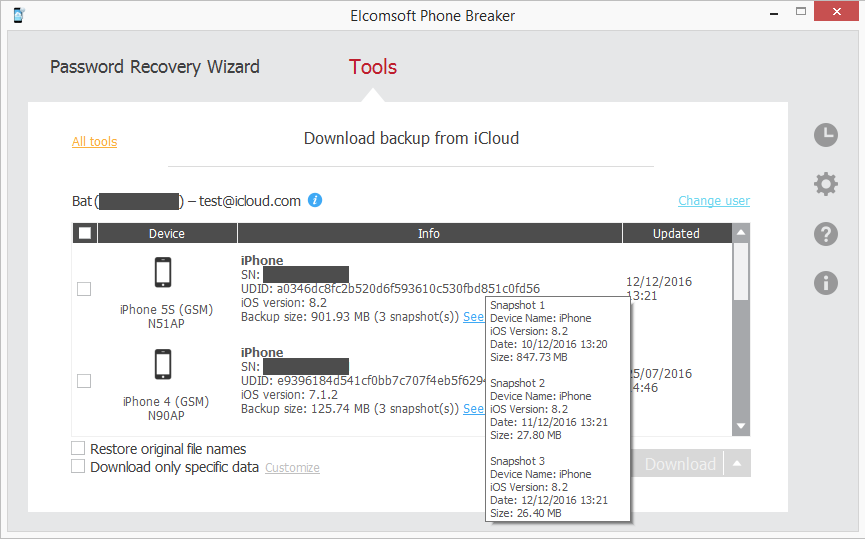
For every snapshot, the following information is displayed:
▪Device Name
▪iOS version
▪Date when the snapshot was made
▪Size of the snapshot
NOTE: For the snapshots other than the first one, the displayed size is the size of the data added by the time the snapshot was saved, not the snapshot itself.
10. Select the device(s) whose backups you would like to download by selecting check boxes on the left.
11. Define the options for downloading backups. Hover over check boxes to view hints for each option.
•Restore original file names: If selected, allows saving all backup files with the same file names as in the iOS operating system, including the full path: e.g. messages (SMS and iMessage) are saved as \HomeDomain\Library\SMS\sms.db (SQLite format).
If it is not selected, the backup will be saved in the same format as iTunes creates when you make the local backup. In that case, you will be able to analyze the downloaded backups with Elcomsoft Phone Viewer (if you are holding a license on EPB, you can get a discount on iBackupBot; contact us for more details) or any 3rd party software that supports iTunes backup format. Note that this option will be enabled automatically, if you select the next one (Download only specific data).
•Download only specific data: Allows selecting certain types of data to be downloaded.
12. Click Download or Download to in order to save the backup to the local computer.
13. Define the location for storing the backup and click Select Folder.
14. Downloading of the iCloud backup begins.
NOTE: If by this moment the token has expired, you will not be able to use it to download backups. However, using the expired token you can still download iCloud Files, and synced data.
You will have the following options:
•Log in again to generate a new token for further downloading of backups
•Proceed with the expired token to download iCloud Files, and synced data.
15. If you have selected several backups, you can click Skip to skip downloading either of them.
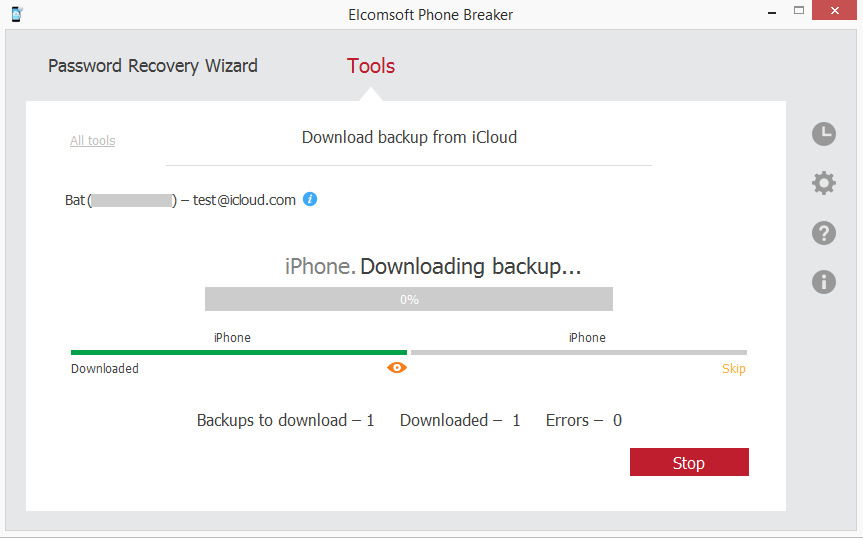
NOTE: The backups that have not been completely created yet will not be downloaded.
16. When downloading is finished, click the View ![]() button to view the backup on the local computer.
button to view the backup on the local computer.
If you have Elcomsoft Phone Viewer installed on your computer, you can explore the backup content by clicking the Open in EPV link.
If you have an older version of Elcomsoft Phove Viewer installed, update it to explore downloaded data.
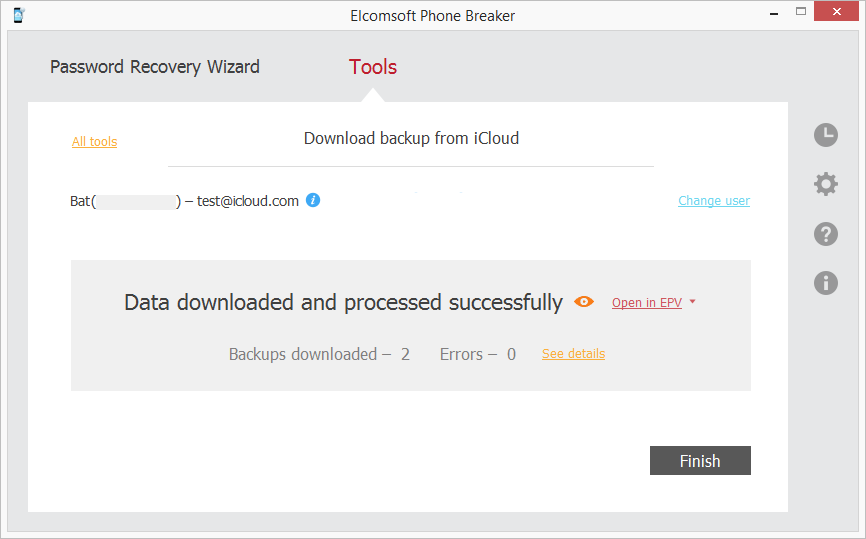
17. Click See details to view the detailed information about the download process.
18. Click Finish to exit the downloading wizard.
Please note, backups starting with iOS 9.x.x and higher have a different structure from iOS 8.0 and lower backups. That is why if there are several backups of different versions for the same device UDID, they will be saved to a local computer in the folder with UDID name. However, the snapshots belonging to different iOS versions will be stored in different subfolders:
▪For iOS 8.0 and lower: in the folder with the name in the form [01][YYYYMMDD_HHMMSSZ][R], where [YYYYMMDD_HHMMSSZ] is the backup date and time stamp.
▪For iOS 9.x.x and higher: in the folder with the name in the form [A30FD565-3776-4B8E-95AB-B4F06FD930BC][YYYYMMDD_HHMMSSZ], where [YYYYMMDD_HHMMSSZ] is the backup date and time stamp.